
 When the homeowner in Devault reached out to us at Blackstone Paving & Excavating, LLC, their driveway had become a patchwork of cracks, worn edges, and uneven transitions. Their goals were straightforward—but not easy: give their asphalt driveway new life, boost curb appeal, and make the ride smooth again.
Here’s how we pulled off the transformation with care for trees, curving lines, and an existing road connection.
The Vision & The Constraints
From our first walkthrough, a few clear priorities emerged:
- The new pavement must blend seamlessly into the existing road surface, without a noticeable “lip” or step.
- The driveway is flanked by mature trees and landscaped areas, so we couldn’t just rip up everything.
- The driveway curves gently, which adds complexity in grading and matching slopes.
- Clean, crisp edges would be essential to preserve the look of the lawn and flower beds.
In short, aesthetics, precision, and minimal disruption would drive how we approach every step.
Careful Planning Around Natural Features
Before we ever touched a machine, our team mapped out the root zones of the mature trees and flagged landscaping edges. We laid out buffer zones so that equipment would not compact the soil right up to tree roots, and used string-lines to mark clean edge boundaries.
This way, we could operate heavy equipment without risking damage to the vegetation or existing features.
Because the driveway curves, our grading plan included custom slope templates to maintain uniform flow. That meant no pooling water, no awkward dips, and a smooth path from the road to the garage.
Removal & Subgrade Prep
We began by milling or cutting away the failing top layer of asphalt across the full width, ensuring we had a consistent base depth. Where needed, we removed degraded materials and replaced them with high-quality base stone.
During this process, extra vigilance was taken when working near tree trunks and planting beds: we avoided pushing debris into root zones and protected adjacent lawns with temporary matting in high-traffic zones.
Once the base was compacted, we fine-graded the surface, paying special attention to the meeting point between the driveway and the road.
That transition had to be gradual and flush.
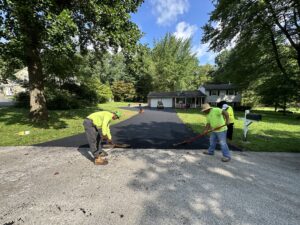
Asphalt Laying & Blending
With the surface prepared, we laid down new hot-mix asphalt in lifts, compacting each layer carefully to avoid offsets or ridges. To handle the transition to the public road, we feathered the edges gently—but maintained full-width structure—so the roadway and newly paved driveway appear as one continuous surface.
On the curved sections, we used hand tools and edging techniques to ensure the edge lines remained crisp. We double-checked slope consistency with laser levels to keep drainage effective and the visual line smooth.
Final Touches & Clean Edgework
After the asphalt cooled and settled, our crew trimmed edges with precision.
We used saw-cuts and mechanical edging to ensure a straight, defined boundary between asphalt and lawn or garden beds. Sod and mulch beds were restored where disturbed, and all surrounding areas were cleaned of any asphalt debris or tack coat residue.
We walked the site with the homeowner to verify that transitions looked seamless, drainage was effective, and trees or plantings were untouched and healthy.
Ready to Reimagine Your Driveway in Devault? Let’s Talk.
If you live in or near Devault, PA, and you’re thinking about refreshing or replacing your driveway, we can help you get results that last and look great. Reach out to us for a free consultation and site review.
Let’s turn your driveway into a feature you’re proud of.
